My related posts:
Copying a Rubens drawing (materials, techniques)
Copying a Rubens painting (materials, techniques)
Inspired by Rubens (Getty Museum page)
English translations of drawing treatises (Goeree, de Piles, Jombert)
Copying a Rubens painting (materials, techniques)
Inspired by Rubens (Getty Museum page)
English translations of drawing treatises (Goeree, de Piles, Jombert)
(for the readers in L.A. - there is an interesting show called Hatched! at the Getty, see it if you can!)
Cross-hatching is a complex skill to master, but not taught in today's "standard" art schools. I have always wondered how different types of hatching were taught in 1400-1700s so I looked at these treatises:
Cennini early 1400s
Leonardo 1510s
Vasari 1550
Armenini 1587
Hilliard 1598-1602
Peacham 1606
Norgate 1620s and 1648
Bates 1634
Bosse 1645
Sanderson 1658
Goeree 1668
de Piles 1684
Salmon 1701
de Lairesse 1701
Jombert 1740 1755
Here is the result:
I A comparison of drawing instruction from the treatises (and with modern instruction in small print),
1) How do I learn cross-hatching?
2) At what point in the drawing process should I start shading?
3) How do I put down the shadow?
4) What should the quality and character of the hatch-marks be?
5) What should be the direction and curve of my marks?
6) How many times can I cross my hatch-marks?
7) How do I distribute shadows in a drawing?
II Links to larger excerpts from the treatises themselves (my translations),
III Bibliography
For preparatory procedures such as setting up the model and lighting, how and where to sit, hand position when holding the pencil, drawing supplies (1400s-1700s) see this post.
Please contact me if you have any comments, corrections or suggestions.
 |
| Three pages from a drawing book by Fialetti 1608, e-book HERE (Getty) |
I Advice on shading and cross-hatching
1) How do I learn cross-hatching?
Since not too many books have detailed instructions on the theory of hatching, even though they are detailed in other respects, I'm assuming copying was how most of the students learned the skill. Every instruction book I have read speaks about copying works on paper by good artists.
Most authors mention copying prints in addition to drawings: for beginners the "drawing book" types of prints - examples with simpler line-work and examples with parts of face and body separated; and for more advanced artists more serious and complex prints by the masters.
* Hilliard (p.80) advises to copy the hatch marks from prints of Dürer; Norgate suggests Goltzius prints and Fialetti's drawing book (Norgate 106), Sanderson suggests prints after Raphael, Armenini (239) advises drawing books and prints in general. Armenini and the Englishmen note that you should copy so well that the print and your drawing become indistinguishable, but Armenini also cautions not to get carried away in the minuteness and prettiness of the lines.
* Both Goeree and de Lairesse say drawings are more natural to copy for a draughtsman than prints (though both books contain prints to be copied by the student). Goeree also cautions that precise copying of prints with pen and ink can tire a student (and is good only for future printmakers).
* Jombert suggests reading Bosse's treatise on intaglio printmaking to those who want to learn more about how to apply cross-hatching lines in drawing, and he borrows some parts of that book in his treatise, even though Bosse wrote it specifically for the burin.
This is different in modern representational art classes where only a few teachers suggest copying drawings and none I know suggest copying prints. Images of good drawings can be easily accessed nowadays, so in a way you don't need prints, yet some part of the aesthetic influence gets lost by omitting them from drawing instruction.

2) At what point in the drawing process should I start shading?
The general drawing process of 1400s-1700s: first the outlines are lightly sketched (often with willow charcoal because of its erasability), then incompletely brushed off and then retraced again, this time with black or red chalk or with pen. Then shadows are added and built up by degrees. This process is described with little variation in most treatises from Cennini (Chapter CXXII) in early 1400s to Jombert (1700s).
In modern instruction the so called "construction lines" or preparatory lines to mark the positions of the parts of the figure take on a life of their own and are drawn so strongly that they are as visible among the final lines unless the eraser is used extensively (which it often is). The old method suggested erasers (soft bread middle or pumice powder) for mistakes rather than for such "clean-up".

My own recreation of the process (copy after Rubens)
1: willow charcoal sketch, 2 and 3: final outline with black chalk, hatching
Here is the process shown in a drawing book prints:

Here is the process shown in a drawing book prints:


3) How do I put down the shadow?
* Shading should be done top to bottom (de Lairesse, Goeree). For me as an artist the reason would be that you don't smudge with your hand what you have already shaded.
Current professors advise shading all parts of the drawing at the same time. I've seen advice to work from top to bottom only in books on scientific illustration, where clarity of the drawing really matters.
* For pen and ink: "In the double and treble shadows, let your first strokes be very dry for fear of blotting, ere you cross them" (Peacham, 26, same advice in a Norgate-related manuscript (Norgate, 240))
* Shading can be started by "reuselen" in Goeree -- (Grainer/ grener / reuselen/ röselen/ тушевать is to smoothly rub the chalk on the grain of the paper to get a textured tone without visible hatch marks, L.R.). A shadow done this way can then be strengthened in places by regular hatching (Goeree, repeated in Jombert).
Stomping and washes can also serve as a base for hatching. "Reuselen" and stomping are not advised to be used on their own because they are devoid of the liveliness that the hatch-marks bring. A mix of all four techniques is can be used. (Goeree repeated in Salmon and Jombert).
Jombert also suggests that black chalk can be used to deepen a red chalk drawing. Salmon suggests livening up a drawing of a face with final "hard touches" with pen and ink where the shadows are darkest.
*De Lairesse suggests to avoid "reuselen" or stomping except in the darkest shadows combined with hatching. He advises the hatch marks to be first put down rather strongly and evenly, then in half-shadows lighter (and uncrossed) and then added with all force in the darkest double or triple shadows.
These techniques can be seen in many elaborate Rubens portraits: a "grained" or smudged shadow "base" with hatch-marks on top, using red black and white chalk, and finally pen and ink accents for pupils, eyelashes, eyebrows, nostrils, mouths, etc.
 |
| Rubens, portrait of Isabella Brant (British Museum) |
(stomping or smudging to the left of the ear;
rough "graining" with black chalk to the right of the ear
and with red chalk on the side of the nose;
and with red chalk on the side of the nose;
parts of the eye accented with ink)
4) What should the quality and character of the hatch-marks be?
* Armenini speaking about chalk drawings suggests to "hatch in several directions, but with such skill that you don't see any rawness or hardness, and you go over it finely until it's finished".
* Goeree: "When making hatch-marks with a pen make sure that they are not scratchy or thin but rather wide and fat, and you must also draw them from above downwards, that is from fine or sharp to wide; uniform and flat shadows must be made evenly wide and similar overall." De Lairesse emphasises the neat, distinct and even quality of hatch-marks even more than Goeree.
* de Piles: Because drawing lacks colour one compensates by "une expression spirituelle des traits" (a spirited expression of lines) that should differ according to the differences in nature. Flesh should be hatched or "grained" smoothly, but draperies should have more hatching and a firmer look. Hair, feathers and fur of animals should be drawn with the tip of the chalk. (this might show some Leonardo influence)
* Jombert: "Flowers and plants should be shaded with delicate and careful hatch-marks in the direction of the growth of their leaves" (Jombert, 122)

Bloemaert, detail of a plate from his "Tekenboek", 1650s
shows lozenge-shaped spaces between hatch-marks in a simplified illustration of working up a shadow
(I have put this in queue to be digitised at the Getty, will insert the link when they do it)
5) What should be the direction and curve of my marks?
* Peacham 1606: "All circular and round bodies that receive a concentration of the light,<...>, when it dooth gather it selfe into a small center, must bee shadowed in circular manner <...>".
Peacham also separately instructs for cheeks of frontal faces and for breasts of the female nudes to be shaded with circular marks.
* The shapes between hatching lines should look like lozenges and not squares (Bosse, Jombert). Square shapes fit stone better, but for flesh something between a lozenge and a square shape is best (Bosse)
* Hatch marks should follow the curve of the object (Peacham, de Lairesse)
From de Lairesse (my translation from a French edition):
p 34 "look at the hatch-marks that pass on the front of the head D and then E. The latter turn to form an arch, the former turn downwards. One sees this difference better when looking at a shaded column placed above or below the horizon line. It will suffice for now to know in what circumstances one should vary the hatch-marks, to get your hand used to it, because the beautiful style (la belle-manière) consists of that."
 |
| Gérard de Lairesse, 1701 download here (Getty Research Institute) |
6) How many times can I cross my hatch-marks? (How many directions can be used in cross-hatching?)
* As many as necessary (Armenini, and the same is implied by Cennini and Jombert)
* No more than three directions of hatch marks are used (Peacham, de Lairesse, Bosse).
* Half shadows should not be cross-hatched (Peacham, de Lairesse)
Peacham (1606) specifies that one layer is used for planes, two for core shadows, and three for crevices and other very dark places:
A "single shadow" is used for flat surfaces that are not in full light,
a "double shadow" for surfaces that "begin to forsake your eyes as you may perceive best in a column",
a "treble shadow" is used "farthest from the light as in gulffes, chinks of the earth, wells, caves within houses <...> under the bellies and flanks of beastes" etc.
"Your treble shaddowe is made by crossing over your double shadow againe, which darkeneth by third part<...>"
Peacham specifies the use of each in shading a portrait and a nude: "first a single shadowe in the temples, then a double shadow in the corner of the eies" or "the shinbone from the knee to the insteppe, is made by shadowing one halfe of the leg with a single shadow" - the directions are very formulaic, but at the same time if beginners follow them, they can get a plausible face and figure without forgetting the main landmarks.
Anyone who in a standard modern art department would dare say that you shouldn't cross lines more than three times in a drawing would risk ridicule. And yet if you examine old master drawings you will see that the majority followed it.
 |
| Peacham 1606, single and double shadow illustrations (in queue to be digitised at the Getty) |
7) How do I distribute shadows in a drawing?
The part closest to you should be lightest and the parts further away should lose themselves in a light shadow (Armenini 83, Vasari 218, Sanderson 48)
Cennini has similar advice - to go many times over the extremities (either periphery or depth) and less over the relief (Capitolo VIII) "nelle stremità vuoi fare più scure, tanto vi torna più volte; e così, per lo contrario, in su e rilievi tornavi poche volte."
Personally I have seen this concept more at work in paintings and large finished compositions than in sketches or studies.
Leonardo (repeated and elaborated by Goeree) says that the perspective of lights and darks should be studied very carefully from life.
Current teachers simply say that less contrast should be used for objects further away. Probably the advice to make everything further from you darker may sound formulaic to modern art professors' ears.
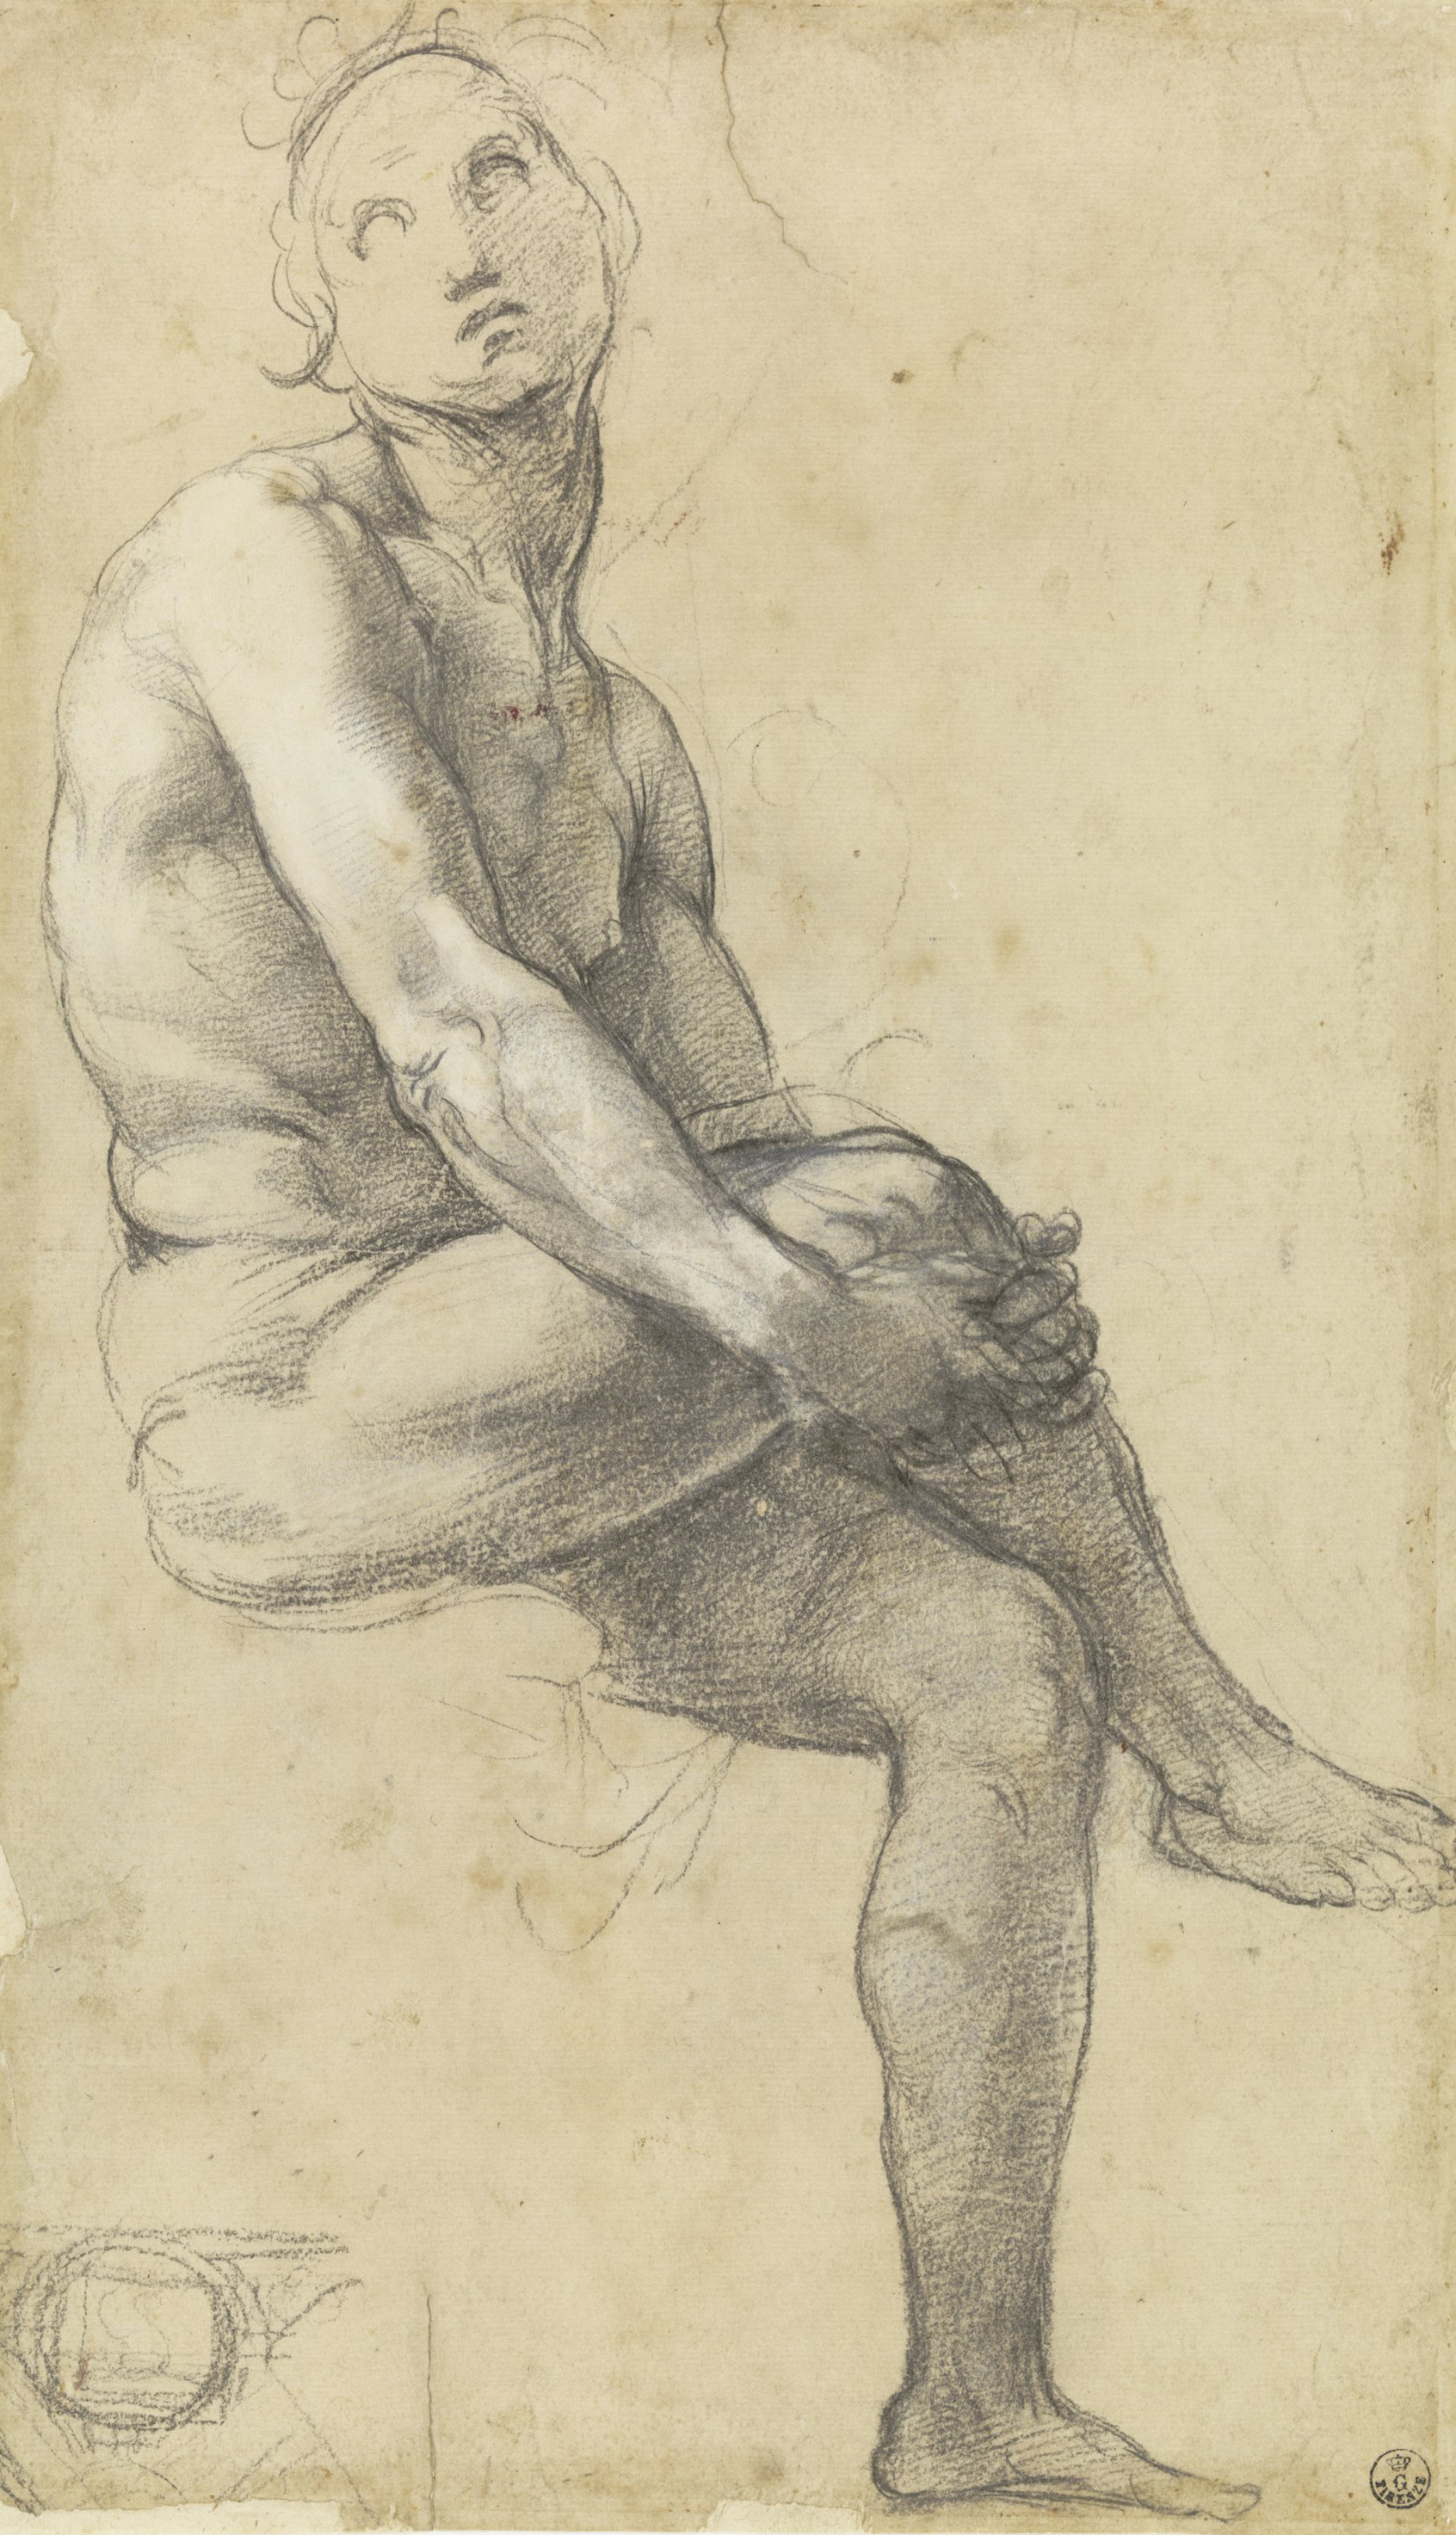
A Raphael drawing illustrating the concept (see above), Uffizi
_______________________________________________________________
_______________________________________________________________
II Excerpts from treatises
1) de Piles "Les premiers élémens de la peinture pratique" has many pages on drawing technique. See my translation of them HERE
2) Jombert: see my translation of some parts of his drawing treatise HERE
3) de Lairesse (my translation from this French translation of his 1701 drawing treatise):
"Lesson 7:
After you finish the contours you place the shadows, which requires getting used to drawing with sanguine to hatch neatly and distinctly without stomping or "grainer" like some masters teach. ( Grainer / grener/ rauselen / röselen / тушевать is to rub the chalk on the grain of the paper in a way to get a textured tone without visible hatch marks, L.R.)
Lesson 8:
Hatch-marks should cross no more than two or three times (in the strongest shadows) as seen in figures 10-16. For relief only one layer of hatch marks should be used, and for deepest hollows you can blend with a stomp or with the crayon (estomper ou grainer). Contours should be lighter on the light side and more pronounced on shadow side. Shading is done from top to bottom with simple, but rather strong hatching with as equal a distance (between lines) as possible. Afterwards hatch the lighter half-shadows with simple, more or less light lines according to the object because half-shadows should never be cross-hatched. To finish and give all the force to the shadows you need to double the hatch marks and even triple them if needed.
<...> for hatching with sanguine (red chalk), it's likely that students will find it more difficult to do than "grainer" (shading with smooth tone), but it will make them develop a firmer hand to make sure that all the hatch marks are of the same thickness and are equidistant <..> it demands more judgement and exactness, then one needs to know what effect is produced by two or three or four lines that cross each other, which can't be learned by simply stomping or "grener" (rubbing the chalk on paper, L.R.). (de Lairesse, 33)
p 34 look at the hatch-marks that pass on the front of the head D and then E. The latter turn to form an ark, the former turn downwards. One sees this difference better when one looks at a shaded column placed above or below the horizon line. It will suffice for now to know in what circumstances one should vary the hatch-marks, to get your hand used to it, because the beautiful style (la belle-manière) consists of that."
_______________________________________________________________
_______________________________________________________________
III Bibliography
(for more links to digitised versions of drawing treatises see this page)
Armenini, Giovanni Battista. De veri precetti della pittura. Ravenna, 1587
Bates, John. The Mysteryes of Nature and Art. London, 1634.
Bosse, Abraham (1602-1676). Traicté des manieres de graver en taille douce sur l'airin. Par le Moyen des Eauxs Fortes, & des Vernix Durs & Mols. Ensemble de la façon d'en Imprimer les Planches, & d'en Construire la Presse, & autres choses concernans lesdits Arts. Par A. Bosse, Graveur en Taille Douce. Paris, 1645
Cennini, Cennino. Il libro dell'arte. Late 1300s to ealry 1400s, Italian and English translation
Goeree, Willem Inleydinge tot de Algemeene Teyken-Konst. 1668, 1670 (this German edition scan is readable quality)
Hilliard, Nicholas (1537 (ca.)-1619). A Treatise Concerning the Arte of Limning, by Nicholas Hilliard, together with, A More Compendious Discourse Concerning ye Art of Liming, by Edward Norgate, with a paralel modernized text. Ed. R.K.R. Thornton and T.G.S. Cain. Manchester, 1981.
The original manuscript written c. 1598-1602
Jenner, Thomas (fl.1631-1656 bio). A Book of Drawing, Limning, Washing or Colouring of Maps and Prints: and the Art of Painting, with the Names and Mixtures of Colours used by the Picture-Drawers. Or, The Young-mans Time well Spent. London, 1652.
Jombert, Charles-Antoine. Methode pour apprendre le dessein. Paris, 1755
Leonardo da Vinci. Trattato della pittura. 1510s, first published 1651 treatiseonpainting.org (or html, liberliber.it pdf)
Lairesse, Gérard de (1640-1711). Grondlegginge ter teekenkonst : zynde een korte en zeekere weg om door middel van de geometrie of meetkunde, de teeken-konst volkomen te leeren. Amsterdam, 1701
in Dutch or its later translation to French HERE.
Norgate, Edward (1580/1 - 1650). Miniatura or the Art of Limning. Ed. J. Muller and J. Murrel. New Haven and London, 1997.
The original manuscripts date c. 1626-8 and c. 1648.
Peacham, Henry (1576?-1643?). The art of drawing with the pen, and limming in water colours, more exactlie then heretofore taught and englarged: with the true manner of Painting upon glasse, the order of making your furnace, Annealing, etc. London, 1606
De Piles, Roger (1635-1709) Les premiers élémens de la peinture pratique. Paris, 1684.
Ratcliffe, Thomas; Daniel, Thomas (printers); Newman, Dorman; Jones, Richard (booksellers) The excellency of the pen and pencil... London, 1668, 1688
Sanderson, William 1586?-1676. Graphice, the use of the pen and pensil, or, The most excellent art of painting : in two parts 1658
© Lala Ragimov